Contents
0%Runway's Gen-3 Alpha made waves with its video generation capabilities, but when it comes to runway lip sync, the results can feel hit-or-miss. Getting a character's mouth movements to match audio accurately, without distortion or uncanny artifacts, takes more effort than most tutorials let on. And if you're producing ad creatives or UGC-style videos at scale, those small imperfections add up fast.
This guide breaks down exactly how lip sync works inside Runway, what you can realistically expect from the tool, and where it falls short for marketing use cases. We'll walk through the step-by-step process for animating talking photos and videos, cover the settings that matter, and flag the common mistakes that trip people up.
If you need studio-grade lip sync for ads and social content, we'll also show how Starpop handles the same workflow, combining multiple frontier AI models (including dedicated lip-sync engines like ElevenLabs) in a single platform built specifically for performance marketers who can't afford uncanny-valley output on their creatives.
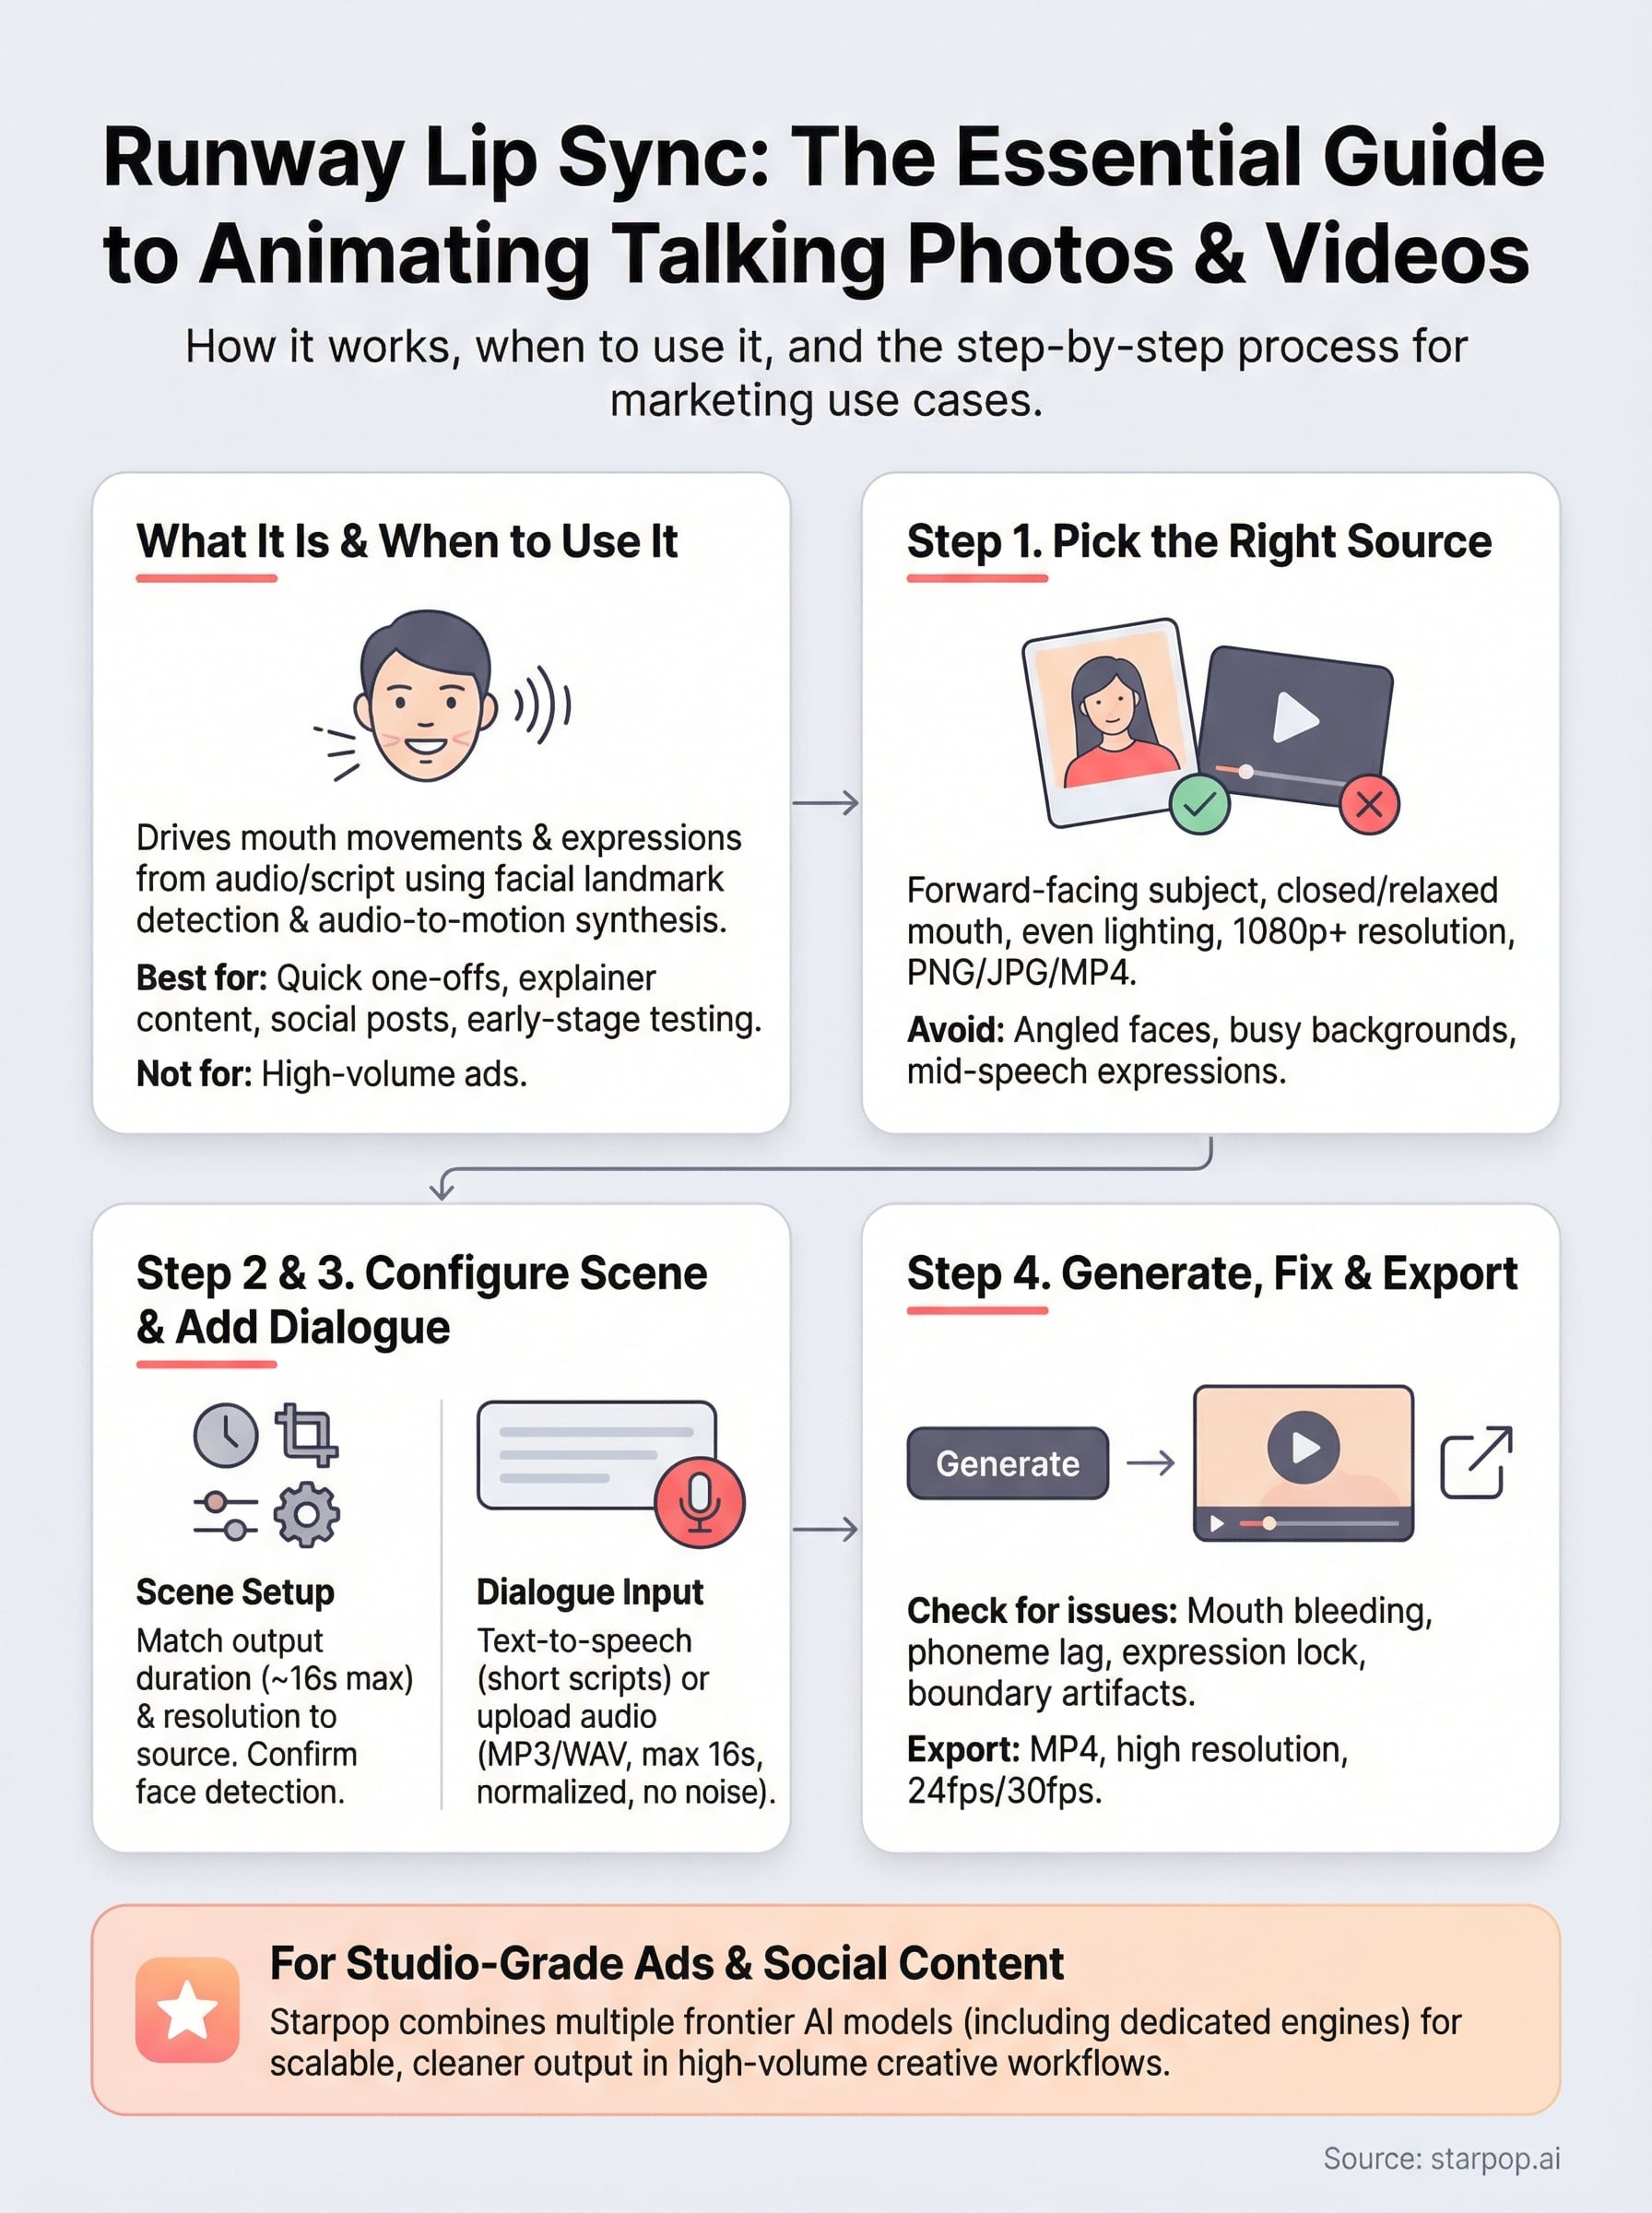
What Runway Lip Sync is and when to use it
Runway's lip sync feature sits inside its Act-One and video generation suite, letting you drive mouth movements and facial expressions from an audio track or a script you type directly into the interface. The tool analyzes phonemes in the audio and maps them to corresponding mouth shapes on the face in your source image or video clip. It's not a standalone app - it's baked into Runway's broader Gen-3 workflow, which means you're working within their credit system and generation queue.
How the technology works
The tool uses a combination of facial landmark detection and audio-to-motion synthesis to animate the mouth region of a subject. When you feed it an audio clip, it breaks the speech into phoneme sequences and generates corresponding visemes (the visual equivalent of a phoneme) frame by frame. The output is a short video where the subject appears to speak the words in your audio. This process works best on forward-facing subjects with clear facial features and minimal motion in the source material.
The cleaner and more static your source image, the more predictable and accurate the lip sync output will be.
When runway lip sync is the right tool
This feature works well for quick one-off animations where you need a talking character from a still image or a nearly static video clip. It fits use cases like explainer content, social media posts where production quality expectations are moderate, or early-stage creative testing before you commit to a more polished production. It's less suited for high-volume ad creative workflows or situations where you need consistent, broadcast-quality output across dozens of variations without visible artifacts.
Step 1. Pick the right image or video
Your source file is the single biggest factor in how clean your runway lip sync output turns out. A poorly chosen image or clip will produce mouth distortion, blurry edges, or a face that shifts unnaturally during animation. Before you upload anything, evaluate your file against a few hard criteria that Runway's model depends on to generate believable motion.
Requirements for images and video clips
A strong source image sets the foundation for clean output. Forward-facing portraits with the subject looking directly into the camera give the model the most accurate facial landmarks to work with. Avoid images where the subject is angled more than 20-30 degrees to either side, and make sure the mouth is closed or slightly relaxed rather than caught mid-expression.

Lighting matters more than most people realize: flat, even lighting on the face produces far fewer artifacts than harsh shadows across the mouth area.
Check your file against these criteria before you upload:
- Resolution: minimum 512x512px, ideally 1080p or higher
- Face angle: straight-on, not more than 30 degrees off-center
- Mouth state: closed or neutral, never mid-speech
- Background: static and simple, not busy or moving
- Format: PNG or JPG for images, MP4 for video clips
Step 2. Open Lip Sync and set up your scene
Once your source file passes the checklist from Step 1, load it into Runway's interface to begin the runway lip sync configuration. Navigate to your dashboard, create a new project, and select "Lip Sync" from the video tools menu. If you don't see it listed directly, check under the "Act-One" section or the video generation panel, since Runway reorganizes its UI periodically. Upload your file and wait for the face detection to complete before touching any other settings.
Configure your scene settings
After uploading your source file, Runway prompts you to confirm scene parameters before generation starts. Set your output duration to match the length of your planned dialogue - Runway currently supports clips up to roughly 16 seconds per generation. Keep your output resolution consistent with your source file to avoid automatic upscaling artifacts that blur the mouth region.
The scene setup stage is where most users waste time: spend 60 seconds confirming these settings upfront rather than burning credits on repeated regenerations.
Before moving to audio input, verify these three settings:
- Output resolution: match your source file exactly, do not let Runway auto-resize
- Clip duration: set to match your intended audio length
- Face detection box: confirm Runway has highlighted the correct face, especially in group shots
Step 3. Add dialogue with text or uploaded audio
With your scene configured, you can feed dialogue into your runway lip sync project using one of two methods: type a script directly and let Runway generate speech, or upload a pre-recorded audio file you already have. Which path you choose depends on how much control you need over voice quality and pacing.
Using the text-to-speech option
Runway's built-in text input lets you type your script and select a voice from its available library. Keep your script under 200 characters per generation to reduce pacing issues at the sentence boundaries. Avoid long compound sentences - short, punchy lines produce cleaner mouth sync than wall-of-text inputs.
Pick a voice that matches your subject's apparent age and gender, or the mouth movements will look mismatched even when the phoneme timing is accurate.
Uploading your own audio file
If you have a custom voice recording or AI-generated voiceover, upload it as an MP3 or WAV file directly into the audio panel. Runway accepts files up to 16 seconds at this stage. Before you upload, normalize your audio to -14 LUFS and remove background noise, since low-quality audio with room reverb or clipping causes the phoneme detection to misfire and produces choppy mouth movement in the final output.
Step 4. Generate, fix issues, and export cleanly
Click Generate and let Runway process your runway lip sync clip. The first pass rarely comes out perfect, so treat it as a diagnostic run rather than a final product. Watch the preview at full speed once, then scrub through it frame by frame around the key phoneme transitions to spot exactly where the mouth movement breaks down.
What to check in the preview
Review the output against the four most common failure points before deciding whether to regenerate or move to export:

- Mouth texture bleeding: edges of the lips blur into the surrounding skin
- Phoneme lag: mouth movement starts a frame or two behind the audio
- Expression lock: face looks frozen except for the mouth
- Boundary artifacts: a visible seam appears around the animated face region
If you catch any of these problems, adjust the source file first (crop tighter, improve lighting) rather than simply regenerating with the same inputs. Regenerating without changing anything rarely fixes structural issues.
Export settings for clean output
Download your final clip as MP4 at the highest available resolution to preserve mouth detail through any downstream compression. Confirm your frame rate is set to 24fps or 30fps to match standard social platform requirements, and verify the audio track is embedded before closing the project.
Always preview the exported file outside Runway before using it in any ad campaign to catch compression artifacts that aren't visible inside the editor.
Next steps for better talking-head ads
You now have a complete picture of how runway lip sync works, where it delivers clean results, and where it breaks down under production pressure. For one-off animations or experimental content, Runway gets the job done. For high-volume ad creative workflows where consistency and quality matter, the limitations stack up quickly across multiple regenerations and voice variations.
Scaling talking-head content requires a platform built specifically for marketing output, not a general-purpose video tool with lip sync bolted on. Starpop.ai combines dedicated lip-sync engines, voice cloning, and batch generation into a single workflow, so you can produce dozens of ad variations without managing separate subscriptions or stitching outputs together from multiple tools. The result is cleaner mouth animation, faster turnaround, and creative assets that hold up on paid social without post-processing fixes.
If you're ready to move beyond single-clip experiments, try Starpop's AI talking-head ad tools and see the difference a purpose-built platform makes.