Contents
0%Kling AI's video and image generation models are powerful, but actually wiring them into your product or workflow means sitting down with the Kling AI documentation and figuring out authentication, endpoints, request parameters, and error handling. That's where most developers hit friction, because the official docs can be dense and scattered across multiple pages.
This guide compiles everything you need in one place: API quickstart steps, endpoint references, request/response examples, and practical tips pulled from real integration work. Whether you're building a custom pipeline or evaluating Kling's capabilities before committing, you'll walk away with a clear path from zero to working API calls.
It's also worth noting: if you'd rather skip the raw API work entirely, Starpop gives you access to Kling alongside other frontier models like Sora, Veo, and ElevenLabs through a single interface built for marketing content, no code required. But if you want the full developer breakdown, read on.
What Kling AI includes and what you need
Before you write a single line of code, you should understand what Kling AI actually offers through its API and what prerequisites you'll need in place. The Kling AI documentation covers three main product areas: text-to-video generation, image-to-video generation, and image generation. Each has its own set of endpoints, parameters, and rate limits, so knowing which one you need upfront saves you from reading docs that don't apply to your use case.
What Kling AI's API covers
Kling's API gives you programmatic access to its core generation models. Text-to-video lets you pass a written prompt and receive a generated video clip, while image-to-video takes a static image and animates it based on a motion prompt. The image generation endpoint works similarly to other diffusion-based APIs, accepting a text prompt and returning a URL to a rendered image. Each endpoint supports different resolution options, aspect ratios, and model versions, so you'll want to check the current model list when you set up your integration.
The API returns asset URLs rather than raw files, so your pipeline needs to handle downloading and storing those assets on your own infrastructure.
What you need before you start
You'll need a few specific items ready before you make your first API call:
- Kling API credentials: An Access Key ID and Access Key Secret, both generated from your Kling developer dashboard
- A JWT library: Kling uses JWT-based authentication, so install a library for your language of choice such as PyJWT for Python or jsonwebtoken for Node.js
- An HTTPS client: Any standard HTTP client works, such as
requestsin Python oraxiosin Node.js - Sufficient credits: API calls consume credits tied to your plan, and video generation costs significantly more than image generation, so check your balance before running batch jobs
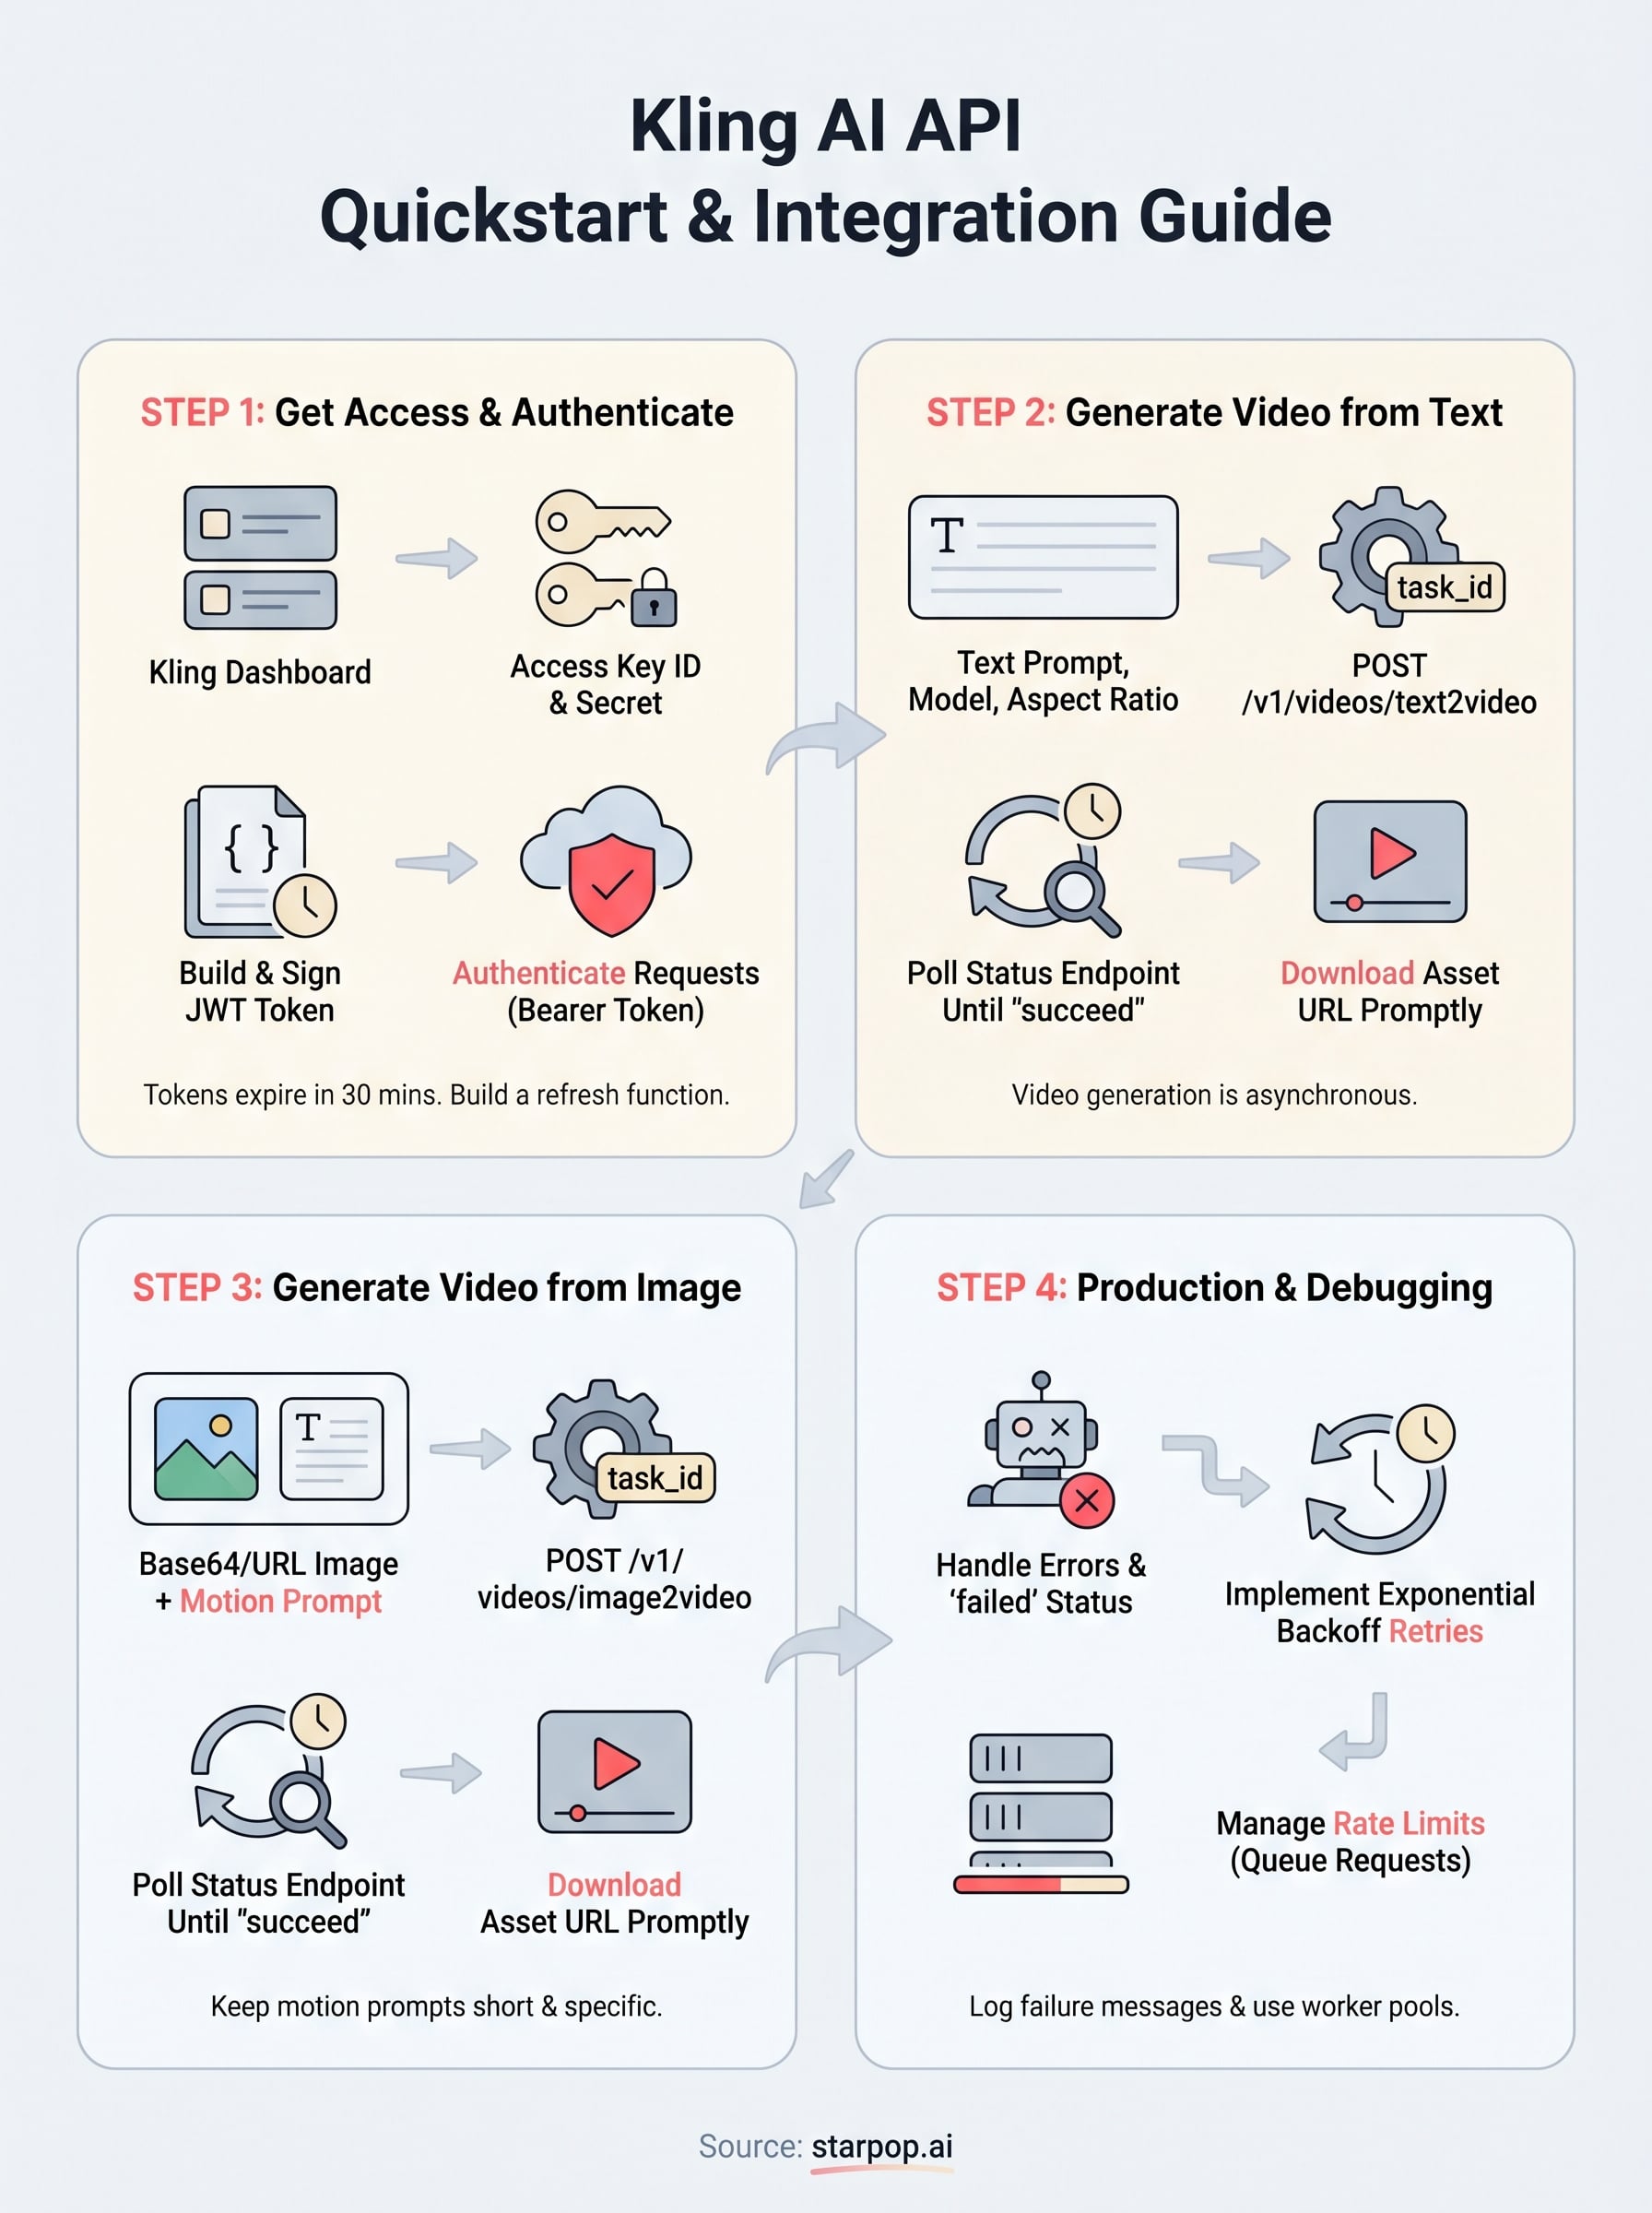
Step 1. Get API access and authenticate
Authentication is the first wall you'll hit when working with the Kling AI documentation. Kling uses JWT (JSON Web Token) signing rather than a simple API key, which means you need to build and sign a token on each request instead of just passing a static header value.

Generate your credentials
Log in to your Kling developer dashboard and navigate to the API section. From there, create a new application to receive your Access Key ID and Access Key Secret. Store both values in environment variables immediately, never hardcode them in your source files.
Your Access Key Secret is shown only once at creation time, so copy it before closing the modal.
Build and sign your JWT
Your token must include a specific payload structure. Use the example below as your starting point:
import jwt
import time

access_key = "YOUR_ACCESS_KEY_ID"
secret_key = "YOUR_ACCESS_KEY_SECRET"

payload = {
    "iss": access_key,
    "exp": int(time.time()) + 1800,
    "nbf": int(time.time()) - 5
}

token = jwt.encode(payload, secret_key, algorithm="HS256")
headers = {"Authorization": f"Bearer {token}"}
Pass headers into every subsequent request. Tokens expire after 30 minutes, so build a refresh function rather than generating a single token at startup.
Step 2. Generate video from text
With authentication working, you can send your first text-to-video request. The Kling AI documentation covers the text-to-video endpoint at /v1/videos/text2video, and you'll send a POST request with your prompt and generation parameters packed into the request body.
Build the request
Your request body needs at minimum a prompt field, but you should also specify model version and aspect ratio to control output quality and format. The example below targets the kling-v1 model at a 16:9 aspect ratio:
import requests

url = "https://api.klingai.com/v1/videos/text2video"
payload = {
    "model_name": "kling-v1",
    "prompt": "A product held by a person walking through a bright modern kitchen",
    "aspect_ratio": "16:9",
    "duration": "5"
}

response = requests.post(url, json=payload, headers=headers)
task_id = response.json()["data"]["task_id"]
Video generation is asynchronous, so the API returns a
task_idimmediately rather than a finished video file.
Poll for the result
You need to poll the task status endpoint at /v1/videos/text2video/{task_id} until task_status returns succeed. Build a loop with a sleep interval of 10 seconds to avoid flooding the API with requests:
import time

def get_video(task_id, headers):
    url = f"https://api.klingai.com/v1/videos/text2video/{task_id}"
    while True:
        res = requests.get(url, headers=headers)
        status = res.json()["data"]["task_status"]
        if status == "succeed":
            return res.json()["data"]["task_result"]["videos"][0]["url"]
        time.sleep(10)
Once the status resolves, download the asset to your own storage promptly, because the returned URL expires after a short window.
Step 3. Generate video from an image
Image-to-video is one of the most useful endpoints in the Kling AI documentation for marketing use cases. You send a static product photo or creative image and Kling animates it based on a motion prompt you provide alongside the image.

Build the image-to-video request
Your image needs to be base64-encoded or accessible via a public URL before you send it. Pass it to the /v1/videos/image2video endpoint along with a short motion description:
url = "https://api.klingai.com/v1/videos/image2video"
payload = {
    "model_name": "kling-v1",
    "image": "https://your-cdn.com/product-photo.jpg",
    "prompt": "The product slowly rotates while soft light sweeps across it",
    "duration": "5"
}

response = requests.post(url, json=payload, headers=headers)
task_id = response.json()["data"]["task_id"]
Keep your motion prompt short and specific. Vague prompts produce inconsistent movement that rarely looks intentional.
Poll and retrieve your result
Use the same polling loop you built in Step 2, but swap the endpoint to /v1/videos/image2video/{task_id}. The response structure is identical, so you can reuse your get_video function without modification by passing the correct base URL as a parameter.
Step 4. Run production workflows and debug issues
Moving from a working prototype to a reliable production pipeline requires you to handle error states and rate limits systematically. The Kling AI documentation lists several task status values beyond succeed, and your code needs to account for all of them before you ship anything.
Handle errors and retries
When your polling loop returns a task_status of failed, pull the task_status_msg field from the response body for a human-readable reason. Build an automatic retry with exponential backoff to handle transient failures without manual intervention:
def safe_poll(task_id, headers, endpoint):
    url = f"https://api.klingai.com{endpoint}/{task_id}"
    for attempt in range(5):
        res = requests.get(url, headers=headers)
        status = res.json()["data"]["task_status"]
        if status == "succeed":
            return res.json()["data"]["task_result"]
        if status == "failed":
            raise ValueError(res.json()["data"]["task_status_msg"])
        time.sleep(10 * (attempt + 1))
Log every
task_status_msgto a persistent store so you can identify patterns in failures across batch runs.
Manage rate limits and batch jobs
Your account has concurrent task limits that vary by plan tier. Queue requests with a semaphore or worker pool to stay under the limit rather than sending all jobs at once and receiving 429 errors.
Next steps
You now have everything covered in the Kling AI documentation that you need to go from zero to a working integration: credentials, JWT authentication, text-to-video and image-to-video requests, polling logic, and production-ready error handling. Your next move is to run each code block in your own environment, confirm you get valid task_id values back, and then build your polling loop around real response data before wiring anything into a larger pipeline.
From there, focus on rate limit management and asset storage as your two biggest scaling concerns. Expired URLs and 429 errors are the most common points of failure in production batch jobs, and both are fully preventable with the patterns covered above.
If you want to use Kling without managing any of this infrastructure yourself, try Starpop's multi-model creative platform to access Kling alongside Sora, Veo, and ElevenLabs through a single interface built for high-volume marketing content.