Contents
0%Every ad, social post, and landing page your brand puts out sends a message, and if the colors, fonts, and logos don't match, that message is "we didn't think this through." A Canva Brand Kit solves this by giving you a centralized place to store and apply your brand's visual identity across every design. It's one of the most practical features Canva offers, and setting it up correctly saves hours of manual formatting down the line.
Whether you're a solo founder cranking out Instagram carousels or an agency managing assets for multiple clients, brand consistency isn't optional, it's what makes people recognize and trust you. The problem is that most teams either skip the setup or only use half the features available. That means they're still manually adjusting colors and re-uploading logos every single time.
This guide walks you through exactly how to create, configure, and get the most out of your Canva Brand Kit, step by step. We'll cover everything from uploading brand assets to managing multiple kits for different clients. And if you're already producing marketing content at scale with tools like Starpop for AI-generated video and image ads, having a locked-in brand kit inside Canva means your static designs stay just as visually consistent as your AI-powered ones.
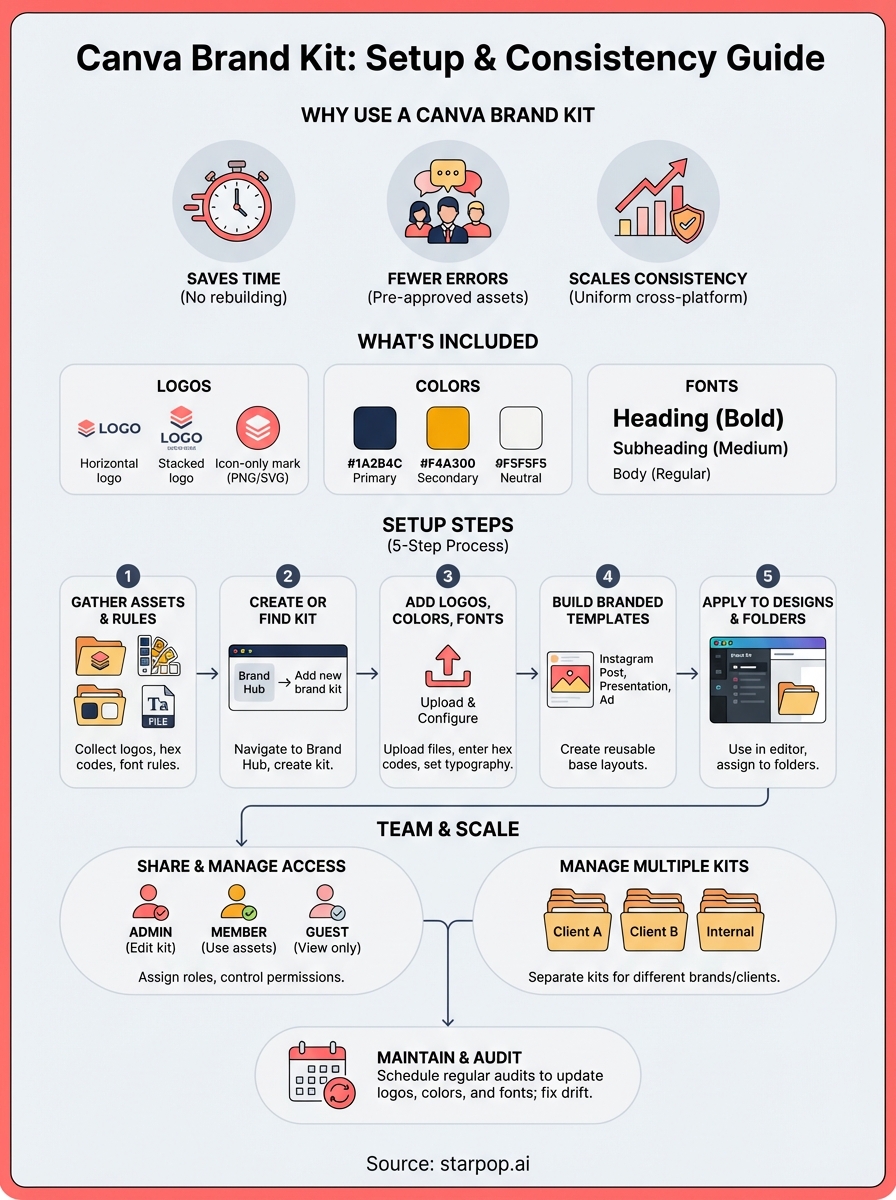
Why use a Canva Brand Kit
When you create content without a system in place, every designer, marketer, or freelancer on your team makes their own judgment calls. Someone picks a slightly different shade of blue, another person uses the wrong font weight, and before long your brand looks like it was assembled by five different companies. A Canva Brand Kit eliminates this by putting your approved colors, fonts, and logos in one shared location that everyone on your team pulls from automatically.
The fastest way to lose brand recognition is to let every team member build designs from memory.
You Stop Rebuilding Every Design From Scratch
One of the most immediate benefits is the time you recover. Without a brand kit, you're opening old designs, copying hex codes, re-uploading logos, and hunting for the right font combination every single time you start a new project. With your brand assets configured in a kit, Canva surfaces your exact palette and typography in the editor sidebar the moment you open a design. You pick a color, the font snaps in, the logo is already uploaded, and you're building on a solid foundation in seconds.
This matters more when you're running high-volume campaigns or managing multiple clients. A brand kit cuts the setup time per design from several minutes down to almost nothing, and those minutes compound fast when you're producing dozens of assets a week.
Your Team Makes Fewer Off-Brand Choices
When brand assets live in a shared kit inside Canva, your team doesn't need to ask which color to use or hunt through a PDF brand guide every time. The approved options are right there, and Canva makes them easy to apply with a single click. This reduces the back-and-forth of catching brand errors in review, which is one of the biggest time sinks for marketing teams.
For agencies managing creative work for multiple clients, this is especially valuable. You can set up separate kits for each client and control which kit is active for a given project. The result is that designers and contractors stay on-brand without needing a lengthy briefing session before each task.
You Scale Content Without Losing Visual Consistency
The more content you produce, the harder it gets to keep everything visually aligned. A brand kit gives you a repeatable system that holds up whether you're making one social post or fifty. When you pair this with a library of branded templates built on top of your kit (covered in a later step), you can delegate content creation to almost anyone and still get output that looks intentional.
Building this kind of system also pays off when you're using AI tools like Starpop to generate video ads and image creatives. Your AI-generated assets will carry their own visual style, and your Canva-designed static content needs to match. A locked-in brand kit keeps your static designs aligned with the broader visual identity you're building, so nothing looks out of place when a customer encounters multiple touchpoints from your brand.
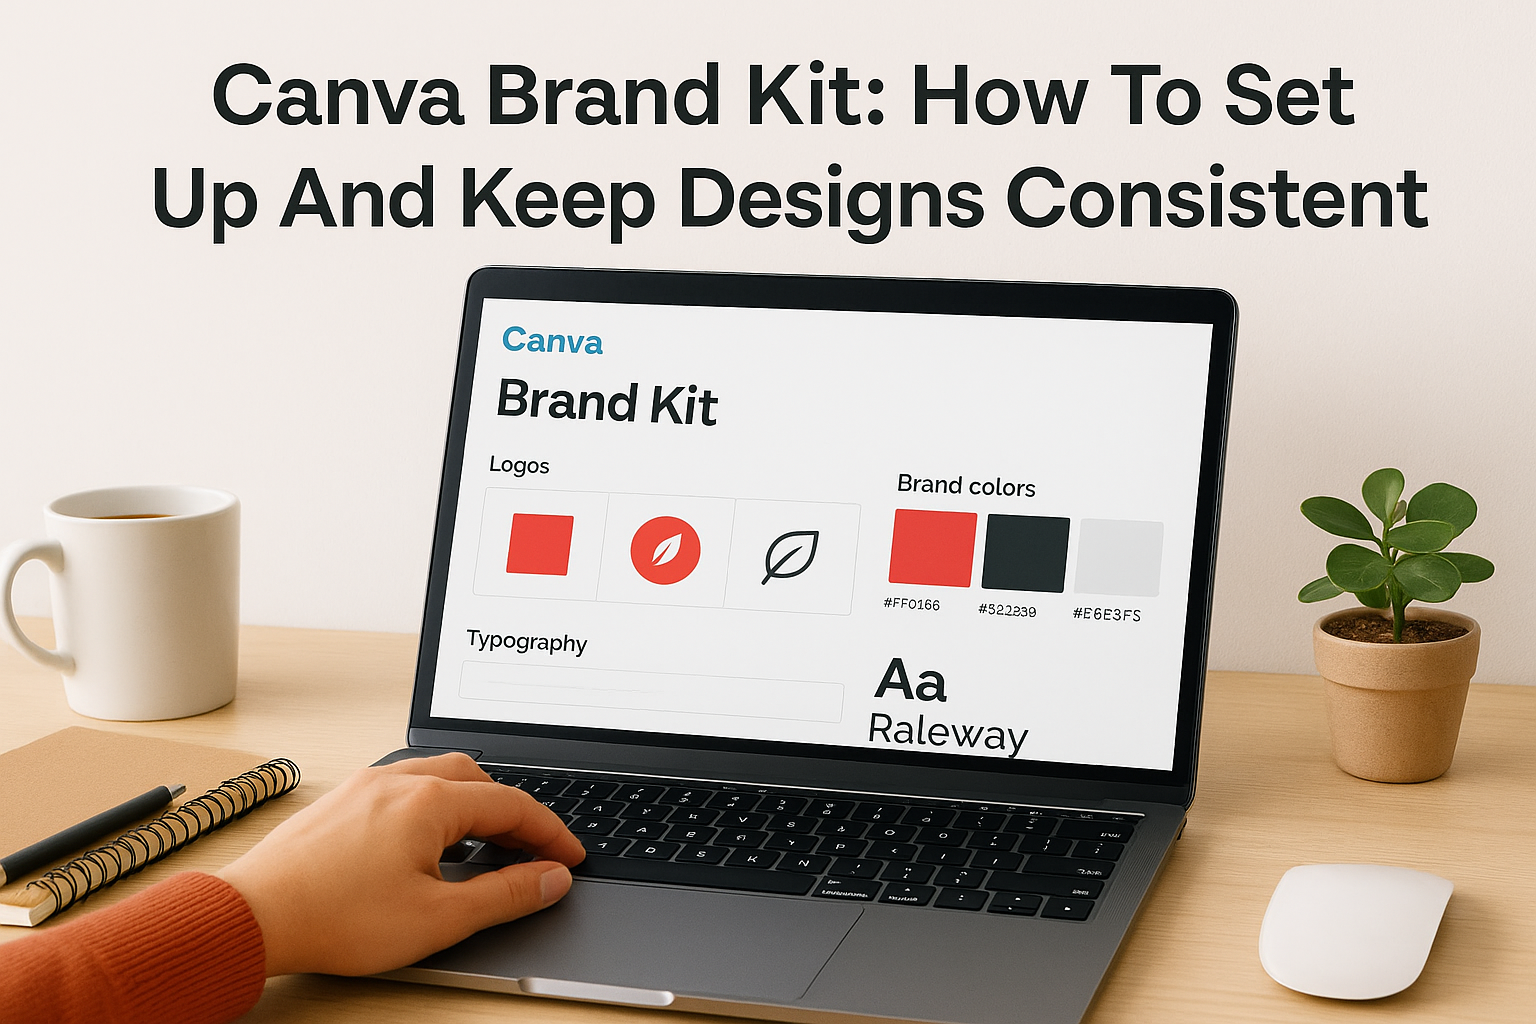
What a Brand Kit includes in Canva
A Canva Brand Kit is a structured container for the core visual assets your brand uses across every design. When you open the editor, everything stored in your kit appears in the sidebar, ready to apply without any searching or manual entry. Understanding what you can store in a kit helps you set it up completely the first time and avoid the habit of patching in assets one by one later.
Setting up your brand kit fully from the start is what separates teams that stay consistent from teams that drift off-brand over time.
Logos
Your kit holds multiple logo variations, which is important because most brands use more than one version depending on context. You can upload a full horizontal logo, a stacked version, an icon-only mark, and a reversed version for dark backgrounds. Canva stores these as separate files within the kit so you can grab the right format for the right design without digging through folders or cloud storage.
Supported file types include PNG, SVG, and JPEG. For best results, upload your logos as transparent-background PNGs or SVGs, since these scale cleanly and work on any background color.
Brand Colors
The color section stores your exact hex codes so nobody on your team is eyeballing a color or typing in an approximate value. You can organize your palette into primary, secondary, and accent groups. Canva applies these colors across fills, text, icons, and borders directly from the sidebar, which makes it fast to keep every element on-brand without checking a separate style guide.
A typical brand color setup in Canva looks like this:
| Color Type | Example Hex | Usage |
|---|---|---|
| Primary | #1A2B4C | Headlines, buttons |
| Secondary | #F4A300 | Accents, highlights |
| Neutral | #F5F5F5 | Backgrounds |
| Text | #222222 | Body copy |
Fonts
The font section stores your approved typefaces for headings, subheadings, and body text. Canva Pro lets you upload custom fonts if your brand uses a typeface not available in Canva's default library. Once uploaded, your custom fonts appear in the editor alongside the standard options, and you can set size and weight defaults to match your brand guidelines.
Before you start: gather assets and rules
Before you touch any settings inside your Canva Brand Kit, you need to have the right assets ready and your brand rules documented. Jumping straight into setup without this preparation usually means you'll be going back to edit things repeatedly, which defeats the purpose of building a consistent system in the first place.
Collect your logo files
Pull together every logo variation your brand uses and make sure each file is in the right format. You want transparent-background PNGs or SVGs for clean scaling across different design backgrounds. At minimum, gather these five versions before you start:
- Full horizontal logo (color version)
- Stacked or vertical logo (color version)
- Icon or monogram mark only
- Single-color or reversed version for dark backgrounds
- Black and white version for print or low-color contexts
If your files are buried in old email threads or a disorganized folder, now is the time to clean that up. Store everything in one location your team can access before you begin uploading.
The quality of your uploaded logo files directly affects how your brand looks in every design your team produces.
Lock down your color palette
You need exact hex codes for every color in your palette, not approximations. If your brand guide only shows a color swatch or a CMYK value, convert it to a hex code before you start. Use the primary, secondary, and accent colors your brand uses most frequently, and include your standard text and background colors.
A simple reference sheet like this helps keep things organized:
| Color Role | Hex Code | Where It's Used |
|---|---|---|
| Primary | #hex | Buttons, headlines |
| Secondary | #hex | Accents, icons |
| Background | #hex | Page and card fills |
| Body Text | #hex | Paragraphs, captions |
Document your typography rules
Write down the specific fonts, weights, and sizes your brand uses for headings, subheadings, and body copy before you open Canva. If you use a custom typeface not in Canva's default library, locate the font files (.ttf or .otf format) on your computer so you can upload them directly. Knowing your typography hierarchy in advance means you configure the font section correctly on the first attempt instead of guessing and adjusting later.
Step 1. Create or find your Brand Kit
Getting to the right place inside Canva takes less than a minute, but the path depends on your account type. You need Canva Pro, Teams, or an eligible education or nonprofit account to access the full Brand Kit feature. If you're on a free plan, you won't see the Brand Kit option in the same location, and the workaround for that comes later in this guide. For now, this step assumes you have a paid plan active.
Knowing exactly where Brand Kit lives before you start saves you from clicking through menus and losing momentum mid-setup.
Navigate to Brand Hub
Log into your Canva account and look at the left sidebar on the home screen. You'll see a "Brand Hub" option listed under your account name or team name. Click it. This opens the Brand Hub dashboard, which is where all your brand kits live and where you'll manage them going forward. If you're inside a team account, this section is shared across everyone in that workspace, so any kit you create here is visible and usable by all members.
Inside Brand Hub, you'll see a "Brand Kit" tab at the top. Click it to land on the page where you can either create a new kit or open one that already exists.
Create a New Kit
On the Brand Kit page, look for the button labeled "Add new brand kit" or the plus icon depending on your Canva version. Click it, and Canva will prompt you to give the kit a name. Name it clearly, using your brand or client name, so anyone on your team immediately knows which kit to use. Once you confirm the name, Canva generates an empty kit ready for your assets.
If a kit already exists for this brand, someone on your team may have started one. Open the existing kit before creating a duplicate to avoid confusion down the line.
Organize Multiple Kits
If you manage more than one brand, create a separate kit for each one. Canva lets you build multiple kits under the same account, which is exactly what agencies need when handling client work. Name each kit with a consistent format, such as "ClientName - Brand Kit," so the list stays organized as it grows. This structure makes switching between brands during active work fast and error-free.
Step 2. Add logos, brand colors, and fonts
With your kit open, you're ready to start filling it with actual assets. This is the core configuration step where your Canva brand kit goes from an empty container to a working system. Work through logos, colors, and fonts in that order so you build a complete visual foundation before moving on to templates or team access.
Upload Your Logos
Inside your kit, locate the logo section and click the upload button. Canva accepts PNG, SVG, and JPEG files. Transparent-background PNGs or SVGs are the right choice for most uploads because they sit cleanly on any background without a white box around them. Upload each logo variation as a separate file so your team can choose the right one for the design they're working on. A complete logo upload typically includes:
- Full horizontal logo on a transparent background
- Stacked or vertical version for square formats
- Icon-only mark for small placements like profile images
- Reversed or white version for dark backgrounds
Once uploaded, each file appears as a thumbnail inside the kit, and your team can drag it directly into any design from the sidebar.
Set Your Brand Colors
Click into the color section and select "Add color." Type your exact hex code into the input field and confirm it. Repeat this for every color in your palette. Canva lets you label each swatch, so name them by role (Primary, Secondary, Background, Body Text) rather than by the color name itself. This makes it immediately clear to anyone on your team which color belongs where without them having to consult a separate document.
Labeling colors by their function, not their name, is what keeps everyone applying them correctly without asking questions.
Add Your Fonts
Go to the font section and click "Upload a font" if your brand uses a typeface not available in Canva's default library. Accepted formats are .ttf and .otf files. After uploading, set each font to its correct role: heading, subheading, or body. For each role, you can also set a default size and weight that matches your brand guidelines. If your brand only uses fonts already in Canva's library, skip the upload step and search for the font by name directly inside the kit to assign it to each role.
Step 3. Build branded templates your team will reuse
Your brand kit stores your assets, but templates are how those assets actually reach finished designs at speed. Once your logos, colors, and fonts are configured, the next step is to build a set of reusable design templates that pull directly from your kit. This means your team starts every new design from a pre-built, on-brand layout instead of a blank canvas.
Templates built on top of your brand kit are what turn a one-time setup into a long-term consistency system.
Start with your highest-volume design types
Identify the two to five design formats your team produces most often and build your first templates around those. There's no value in creating templates for formats you rarely use. Focus on what you actually repeat week over week. Common starting points include:
- Instagram square post (1080x1080px)
- Instagram Story or TikTok vertical (1080x1920px)
- Facebook ad (1200x628px)
- Email header (600x200px)
- Presentation slide deck (1920x1080px)
For each format, build one base template with your brand colors applied, your approved fonts set to the correct hierarchy, and your logo placed in its standard position. Leave the key content areas open so anyone can swap in new text or images without touching the structure.
Lock elements to prevent off-brand changes
Inside the Canva editor, you can lock specific elements so they can't be moved or edited accidentally. Right-click any element and select "Lock" to fix it in place. Apply this to your logo, background color blocks, and any structural layout elements that should never change between uses. This is especially important when templates are shared with contractors or junior team members who may not know the brand rules in detail.
Save and label templates in your shared workspace
Once you finish building each template, save it to your Canva brand kit or shared team folder so everyone in the workspace can find it without asking. Name each template clearly using the format, placement, and purpose, such as "Instagram Post - Product Launch" or "Facebook Ad - Square." Using consistent naming conventions from the start keeps your template library usable as it grows and prevents teams from duplicating work by building the same layouts twice.
Step 4. Apply Brand Kits to folders and designs
Building a complete brand kit is only useful if your team actually applies it while working. This step covers how to pull your kit into active designs and how to connect kits to specific folders so the right assets are always available for the right project without any manual switching.
Apply Your Kit Inside the Editor
Every time you open a design in Canva, your active brand kit appears in the left sidebar under "Brand." Click into any text element, shape, or background and your kit's color palette shows up as the first option in the color picker. Your uploaded fonts appear at the top of the font selector, and your logos are available to drag directly onto the canvas.
Applying your brand kit from the sidebar is the fastest way to make sure every design element stays on-brand without double-checking a style guide.
To switch which kit is active for a specific design, click the brand kit name in the sidebar and select a different kit from the dropdown. This is particularly useful when a single workspace holds kits for multiple clients, because you can swap to the correct brand in seconds rather than re-uploading assets from scratch.
Connect Kits to Folders for Client or Campaign Work
Canva lets you organize designs into folders and associate a specific kit with each one. To do this, navigate to your folder in the home screen, open the folder settings, and assign your chosen kit as the default for that folder. Every design opened from that folder will load the correct kit automatically without anyone needing to manually select it.
This folder-to-kit connection is the most practical setup for agencies managing multiple clients. Here is a simple way to organize your folder structure around it:
| Folder Name | Assigned Kit | Contents |
|---|---|---|
| ClientA - Social | ClientA Brand Kit | Instagram posts, Stories |
| ClientA - Ads | ClientA Brand Kit | Facebook and Google ads |
| ClientB - Social | ClientB Brand Kit | LinkedIn and Twitter posts |
| Internal - Marketing | Starpop Brand Kit | Company content, decks |
Keeping your folder names and kit names consistent with each other eliminates confusion when you're moving fast across multiple projects and need to hand work off to a teammate without a lengthy briefing.
Step 5. Share access and manage team permissions
A Canva brand kit only works as a team asset if the right people can access it and the wrong people cannot change it. Once your kit is built, you need to add your team members to the workspace and set their permission levels so everyone works from the same assets without accidentally overwriting them.
Add team members to your workspace
From your Canva home screen, click on your team name in the top left and select "Invite members." Enter each person's email address and choose their role before sending the invite. Canva sends them a direct link to join the workspace, where they'll immediately see your shared brand kit inside Brand Hub once they accept.
Getting everyone into the same workspace is the single step that makes your brand kit a shared system rather than a personal one.
If you manage freelancers or contractors who work on short-term projects, you can invite them as guests with limited access rather than full team members. This keeps your kit visible to them without giving them editing rights over your core brand assets.
Set role-based access to protect brand assets
Canva offers three main permission levels that control what each team member can do inside a shared workspace. Assigning these correctly prevents anyone from unintentionally editing your uploaded logos, color swatches, or font configurations.
| Role | What They Can Do |
|---|---|
| Admin | Create, edit, and delete brand kits; manage team members |
| Member | Use brand kit assets in designs; cannot edit the kit itself |
| Guest | View and use shared designs; no access to Brand Hub settings |
Assign the Admin role only to people who are directly responsible for maintaining brand standards, such as a brand manager or lead designer. Give everyone else the Member role so they can pull from the kit freely in their day-to-day design work without touching the underlying setup.
Restrict template editing for contractors
When you share a branded template with external collaborators, use the "Can view" link option instead of "Can edit." This lets a contractor open the template and make a copy for their own use without modifying the master version you built. Go to the template, click Share, and switch the access setting to view-only before copying the link.
Canva Brand Kit plans, limits, and workarounds
Not every Canva account gives you the same level of access to the Brand Kit feature, and knowing where the walls are before you hit them saves you from mid-project surprises. The full brand kit setup covered in this guide requires a paid plan, but there are practical options depending on your account type and team size.
What Each Plan Gives You
Your access to the Canva brand kit depends entirely on the plan your account runs on. Free users get a stripped-down version with limited asset storage, while paid plans unlock the full setup including multiple kits, custom fonts, and team sharing.
| Plan | Brand Kits | Custom Fonts | Multiple Kits | Team Access |
|---|---|---|---|---|
| Free | 1 (limited) | No | No | No |
| Canva Pro | Yes (full) | Yes | Yes | No |
| Canva Teams | Yes (full) | Yes | Yes | Yes |
| Education/Nonprofit | Yes (full) | Yes | Yes | Yes |
The Teams plan is the right choice if more than one person needs to create and edit brand kits in a shared workspace.
Canva Teams requires a minimum of two seats, so if you're a solo designer, Pro is the more cost-effective starting point. For agencies managing multiple clients, Teams pays for itself quickly because every member can access all shared kits without switching accounts.
Working Around Free Plan Limits
If you're on a free Canva account and need basic brand consistency, you can still store one partial kit with limited colors and logos. The workaround is to create a pinned template with your brand colors pre-applied and your logo already placed, then duplicate that template every time you start a new design. It's more manual than a proper kit, but it keeps your outputs consistent until you upgrade.
Kit Limits to Know Before You Scale
Even on paid plans, Canva imposes practical limits on how many custom fonts and logo files you can store per kit. As of current platform behavior, each kit supports up to 100 uploaded logo files and multiple font families, which is enough for most brands. If you're managing a large agency with many sub-brands, split assets across separate kits per brand rather than loading everything into one kit, because an overloaded kit becomes hard to navigate and slows down your team's workflow.
Maintain and troubleshoot Brand Kits over time
A Canva brand kit is not a one-time setup. Your brand evolves, fonts get updated, color palettes get refined, and logo files get replaced with better versions. Treating your kit as a living document and scheduling time to review it keeps your team building from accurate, current assets rather than outdated ones that quietly chip away at visual consistency.
A kit that nobody updates is only slightly better than no kit at all.
Schedule regular kit audits
Set a recurring reminder every quarter to open your brand kit and check each section. You're looking for three things: logos that are outdated or low-resolution, color swatches that no longer match your current brand palette, and fonts that have been replaced or renamed. Catching these early means your team never spends weeks producing content from the wrong version of your brand.
Here is a simple audit checklist to run through each quarter:
- Confirm every logo file is the most current version and uses a transparent background
- Verify each hex code matches your current brand style guide exactly
- Check that all uploaded fonts load correctly and match the weights you actually use
- Remove any kit assets that are no longer part of your active brand
- Update template files if any structural changes were made to your brand guidelines
Fix common issues quickly
Two issues come up most often when teams use a shared kit over time. The first is missing or broken font uploads, which happens when a custom font file gets corrupted or the original upload was the wrong format. Fix this by deleting the broken font entry in your kit and re-uploading a clean .ttf or .otf file from your local machine. Canva will then rebuild the font reference across your kit without affecting existing designs that already use it.
The second issue is color drift, where someone edited a color swatch directly inside a design instead of updating the kit. This creates a mismatch between what the kit shows and what designs actually use. The fix is straightforward: open your kit, locate the affected swatch, and re-enter the correct hex code to overwrite the drifted value. Then notify your team so everyone pulls fresh colors from the updated kit going forward rather than copying from an old design that contains the wrong value.
Wrap-up
A Canva brand kit gives you a reliable system that keeps every design your team produces visually consistent, from the first logo upload to the templates your contractors use daily. The steps in this guide cover the full setup: gathering assets before you start, configuring logos, colors, and fonts, building reusable templates, managing team permissions, and keeping the kit current as your brand evolves. Each step builds on the last, so skipping one creates gaps that show up in your finished content.
Your static designs are only part of the picture. If you're running paid social campaigns or scaling ad creative, your video and image ads need to carry the same visual identity. Starpop's AI content creation platform lets you generate high-converting video and image ads at volume while staying aligned with the brand standards you just locked down in Canva. Consistent branding across every format is what builds recognition over time.