Contents
0%Adding subtitles to your videos isn't optional anymore, it's how you keep viewers watching. Studies consistently show that captions boost watch time and engagement, especially on platforms where most people scroll with the sound off. Kapwing subtitles offer one of the more accessible ways to auto-generate captions directly in your browser, no software downloads required.
Kapwing's subtitle tool works well for creators who need a quick captioning workflow without a steep learning curve. You upload a video, let the AI transcribe it, make your edits, and export. It handles the basics, but if you're producing ads or marketing content at scale, you'll likely hit some limits in customization and output volume before long.
This guide walks you through the full process: generating auto-captions in Kapwing, editing them for accuracy, styling them to match your brand, and downloading the final result. We'll also cover where Kapwing falls short for high-volume content production and how a platform like Starpop, built specifically for creating marketing videos with features like studio-grade lip-syncing and 100+ language support, can pick up where general-purpose editors leave off.
What you need before you start
Before you jump into generating Kapwing subtitles, a few quick checks will save you time and frustration. Getting your account, file, and browser setup right from the beginning means the captioning process runs smoothly instead of stalling halfway through.
A Kapwing account and the right plan
You need a Kapwing account to access the subtitle tool. The free tier works for basic testing, but it has real limitations that matter for production work. Free exports include a Kapwing watermark, and you're capped on export resolution, which makes it a poor fit for anything you plan to publish.
If you're adding captions to content that represents your brand, a watermarked export is a non-starter. Upgrade to a paid plan before you start if you need clean, publishable results.
Kapwing's Pro plan removes the watermark and raises the file size limit. Check the current plan details directly on Kapwing's pricing page before committing, since these limits update periodically.
Your video file and format requirements
Your video file needs to meet a few technical specs before upload. Kapwing accepts most common formats, but knowing the limits upfront prevents upload errors:
| Requirement | Details |
|---|---|
| Supported formats | MP4, MOV, AVI, WebM |
| Maximum file size | Up to 6GB on Pro |
| Recommended resolution | 1080p or lower for faster processing |
| Audio quality | Clear dialogue with minimal background noise |
Audio clarity is the single biggest factor that determines how accurate your auto-generated transcript will be. If your video has heavy music, overlapping speakers, or noisy ambient sound, the AI will make more errors, and you'll spend more time correcting the transcript manually.
A browser and a stable internet connection
Kapwing runs entirely in your browser, so you don't install anything. That said, Chrome or Edge are the most reliable options for the full editing experience. Safari can behave inconsistently with some of Kapwing's export functions, so it's worth switching browsers if you run into issues.
Your internet connection speed also matters more than you'd expect. Uploading a large video file on a slow connection can time out or produce errors mid-upload. If you're working with files over 500MB, make sure you're on a stable, fast connection before you start. A failed upload mid-process means starting over.
Step 1. Upload your video and open the Subtitles tool
Getting your video into Kapwing and finding the subtitles panel takes less than two minutes, but the order of steps matters. Skipping ahead or clicking the wrong option can land you in the wrong editor view, which wastes time backtracking.
Navigate to Kapwing and start a new project
Go to kapwing.com and sign into your account. From the dashboard, click "Create New Project" in the top right corner. Kapwing will open a blank studio workspace where you can upload your file.
To upload your video, follow these steps in order:
- Click the "Add Media" button in the left panel.
- Select "Upload from device" and choose your video file.
- Wait for the upload to complete fully before doing anything else. The progress bar will turn green when it finishes.
- Drag the uploaded clip onto the timeline at the bottom of the screen to add it to your project.
Do not close or refresh your browser tab during the upload. Interrupting the process forces you to start the upload again from scratch.
Open the Subtitles panel
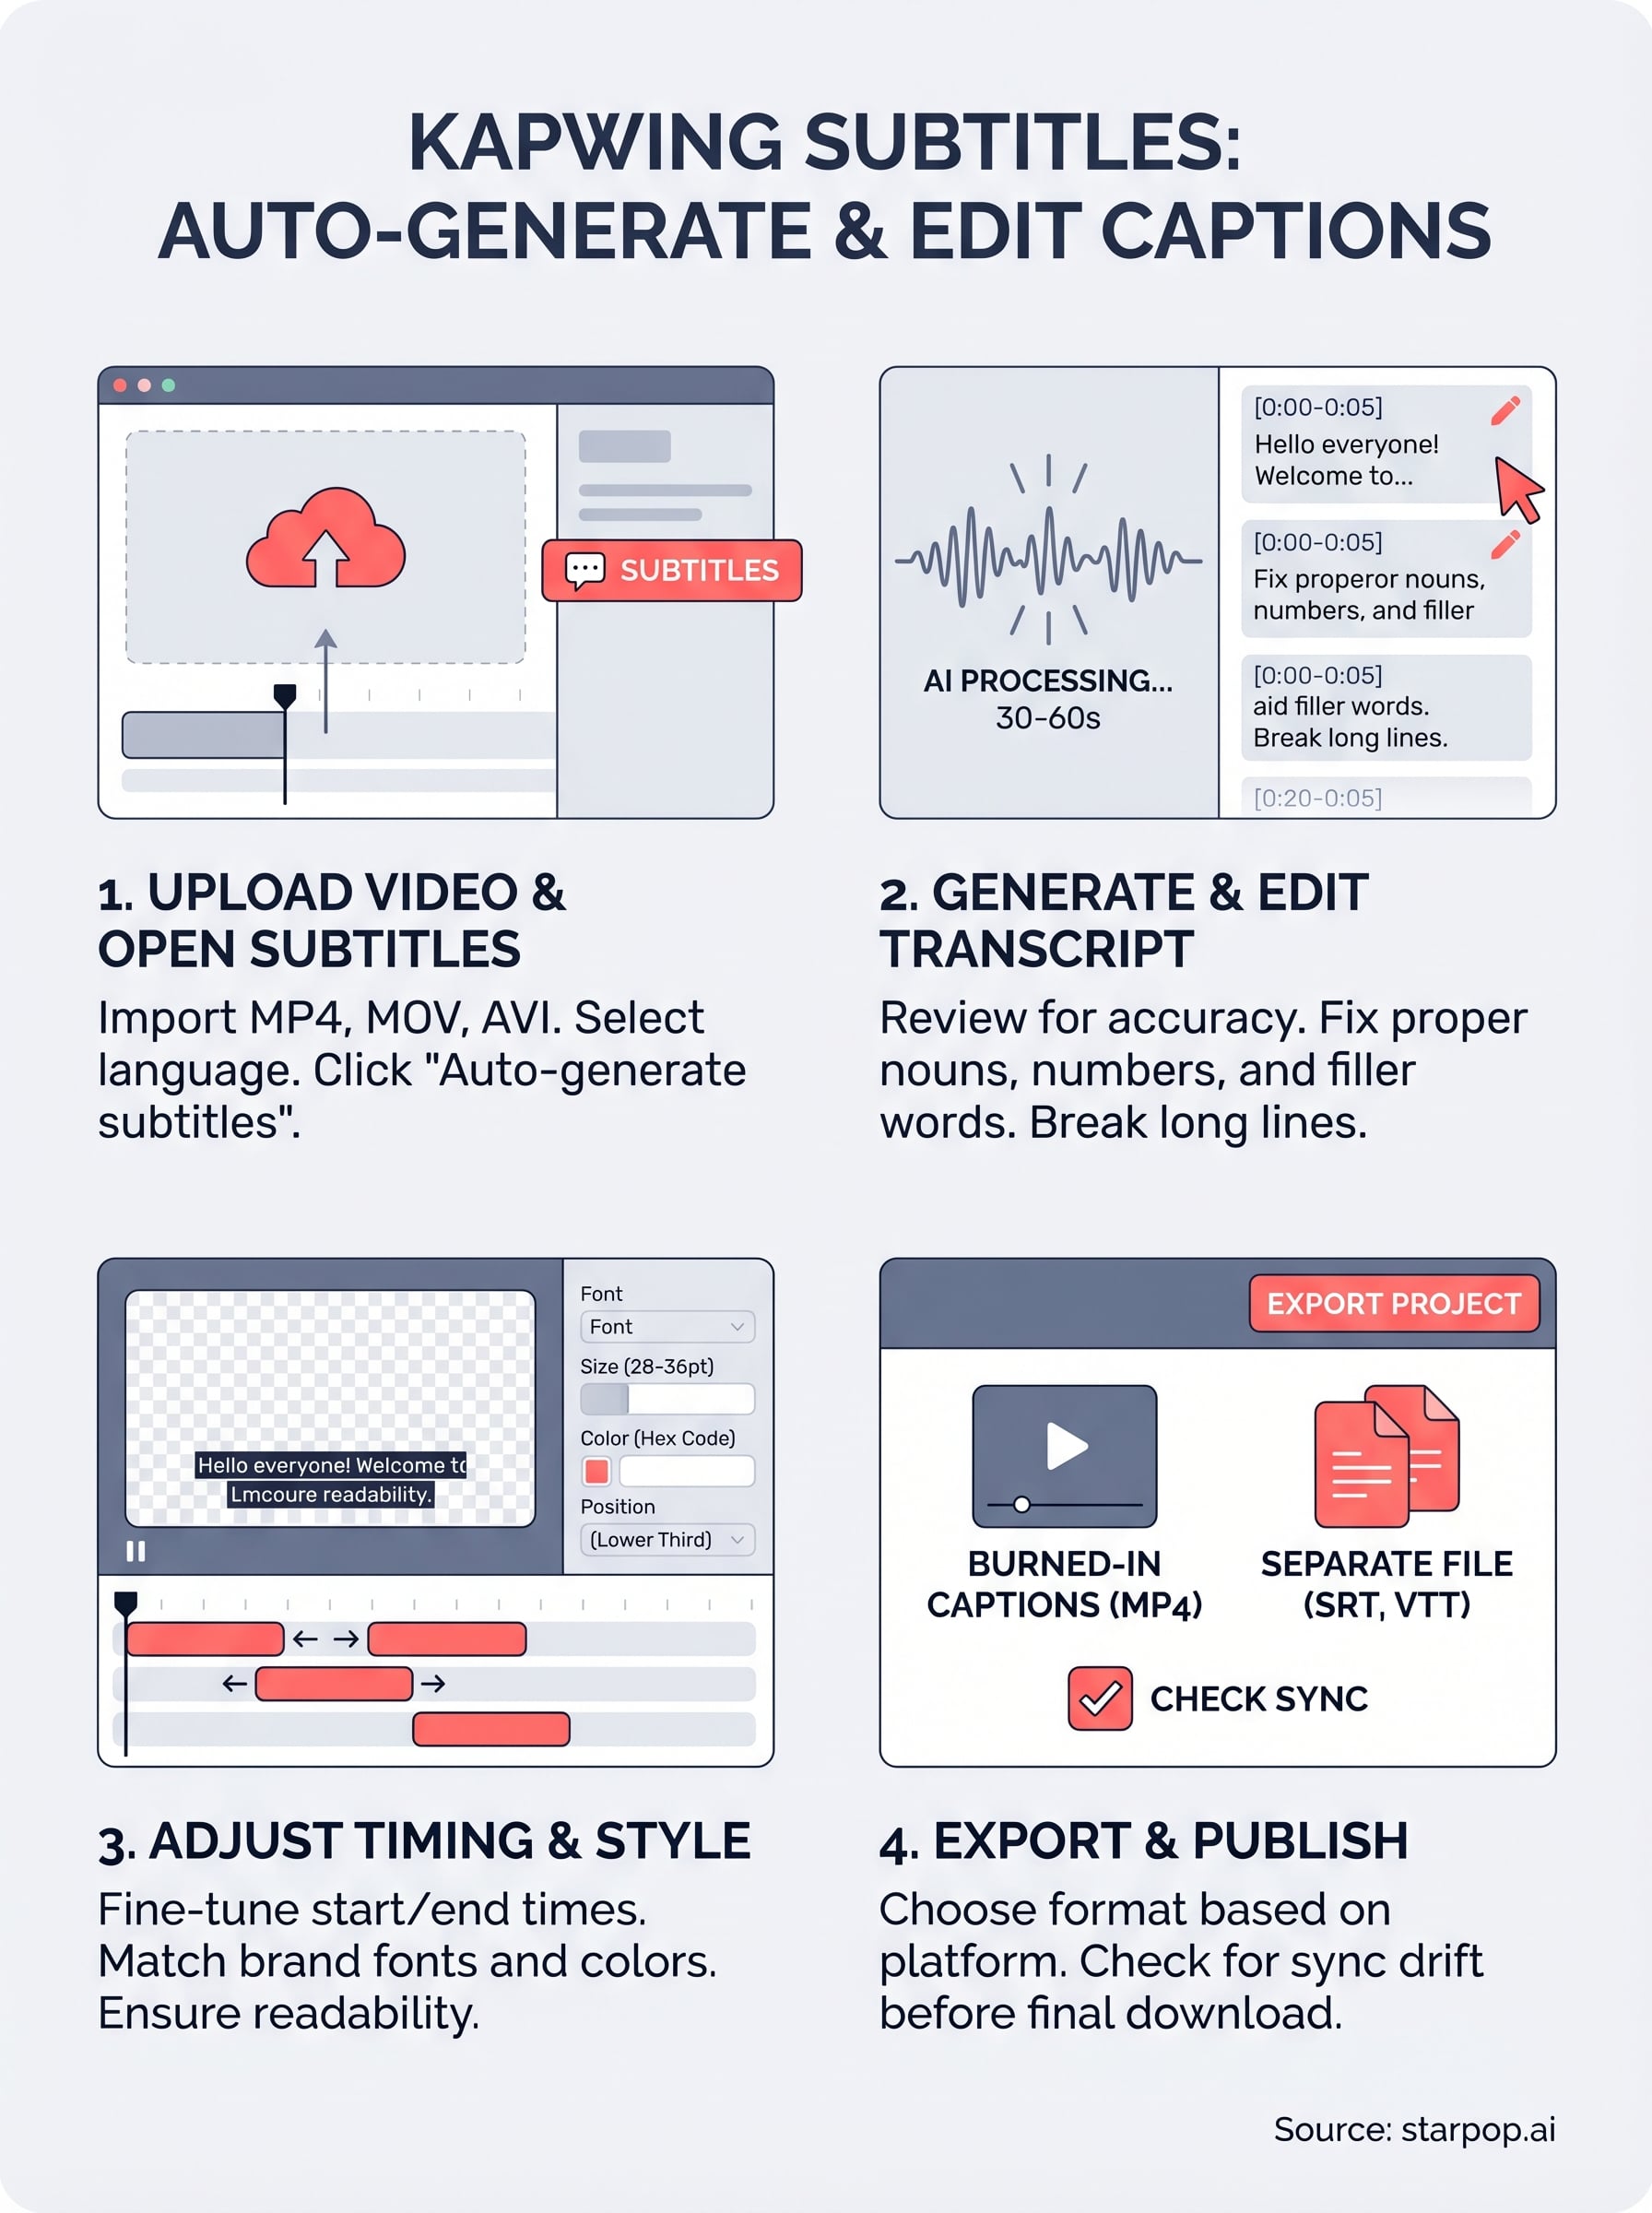
Once your video sits on the timeline, look at the left sidebar for the "Subtitles" tab. Click it to open the Kapwing subtitles panel. You'll see two options: "Auto-generate subtitles" and "Upload a subtitle file." For most users, auto-generate is the right choice. Select the language your video is recorded in from the dropdown before you proceed. Choosing the wrong language at this stage means the AI transcribes in the wrong language and you lose time regenerating.

Step 2. Generate subtitles and clean up the transcript
With your video on the timeline and the subtitles panel open, you're ready to run the transcription. Click "Auto-generate subtitles" and Kapwing will start processing your audio immediately. Most clips under five minutes complete in 30 to 60 seconds, though longer videos take proportionally more time. Do not navigate away from the tab while the AI is working, or the process may stall and require you to start over.
Run the auto-transcription
Once processing finishes, Kapwing subtitles appear as individual text blocks in the left panel, and each caption overlays directly on your video preview. Every block shows the caption text alongside its timestamp. At this stage, resist the urge to adjust fonts or colors. Fix accuracy first, then handle styling in the next step.
Kapwing's AI performs best on clear, single-speaker audio. If your video has heavy background music or overlapping voices, expect to spend significant time on manual corrections before moving forward.
Edit the transcript for accuracy
Scroll through every subtitle block from top to bottom and compare each line against what you actually hear in the video. Common transcription errors cluster around proper nouns, brand names, numbers, and technical terms. Click any subtitle block directly to edit the text inline. Here are the corrections you'll make most often:
- Proper nouns and brand names: The AI often phonetically misspells unfamiliar names
- Numbers and percentages: Spoken figures transcribe incorrectly more than you'd expect
- Filler words: Remove "um," "uh," or false starts if you want clean, professional captions
- Long lines: Break any block over six words into two shorter lines for better on-screen readability
Complete the full transcript review before moving on to timing and style adjustments.
Step 3. Fix timing, speakers, and caption style
With your transcript clean and accurate, you can shift focus to timing and visual presentation. Even a perfectly accurate transcript looks wrong if captions appear half a second late or cover your subject's face on screen.
Adjust subtitle timing
Kapwing subtitles display a start time and end time for every caption block in the left panel. If a caption appears too early or too late relative to the spoken word, click the timestamp field on that block and type in a corrected value. You can also grab the caption block directly on the timeline and drag it left or right to nudge the timing manually.
Small timing errors are easy to miss on a fast scroll, so scrub through the full video at 1x speed after correcting timestamps to catch anything that still feels off.
Common timing fixes you will run into:
- Early captions: Reduce the start time by 0.2 to 0.5 seconds
- Late captions: Increase the start time and shorten the end time to keep the block tight
- Overlapping blocks: Push the later block's start time forward until there is a clean gap between the two
Style your captions
Once timing is locked, open the style panel on the right side of the Kapwing editor. Here you control font, size, color, position, and background. Keep your captions readable by placing them in the lower third of the frame and choosing a font size between 28pt and 36pt for standard 1080p output.
For brand consistency, match your caption font and color to your existing visual identity. If your brand uses a specific hex code, enter it directly into the color picker field rather than relying on the preset swatches.
Step 4. Export captions and troubleshoot sync issues
With your Kapwing subtitles styled and timed correctly, exporting is straightforward. Click the "Export Project" button in the top right corner of the editor. Kapwing will render your file and present download options based on your account plan.
Choose your export format
Your export choice depends on how you plan to use the captions. Kapwing gives you two main paths: burn captions into the video (open captions) or download a separate subtitle file (closed captions). Burned-in captions are permanent and visible on any platform without extra configuration. A separate file gives you flexibility to toggle captions on and off, but the platform you publish to must support it.
| Format | Best for | Notes |
|---|---|---|
| MP4 with burned captions | Social media, ads | Captions always visible |
| SRT file | YouTube, Vimeo uploads | Requires manual upload to platform |
| VTT file | Web video players | Standard format for HTML5 video |
If you're publishing to multiple platforms, export both an MP4 with burned captions and a standalone SRT file so you have options without re-exporting later.
Fix sync issues before you publish
Sync problems usually fall into one of two patterns: captions that drift gradually over the full video, or isolated blocks that appear at the wrong moment. Gradual drift typically points to a frame rate mismatch between your source file and Kapwing's processing. Re-export your original video at 24fps or 30fps using a tool like VLC before re-uploading, and the drift usually disappears.
Isolated sync errors are simpler to fix. Return to the subtitles panel, locate the specific block by its timestamp, and manually adjust the start and end time values by 0.2 to 0.5 seconds until the caption lines up with the audio.
Next steps
You now have everything you need to generate, edit, style, and export Kapwing subtitles from start to finish. The process is straightforward once you know where the timing controls live and what export format fits your publishing destination. Run through your next video using these steps, and the whole workflow should take you under 10 minutes for a short clip with clean audio.
Kapwing handles captioning well for general use, but if you're producing marketing videos at scale with multiple languages, lip-synced audio, or high-volume ad creative, you'll outgrow it quickly. Starpop is built specifically for that kind of production work. It brings together AI video generation, voice cloning, and studio-grade lip-syncing across 100+ languages in a single platform designed for performance marketers. If scaling your video ad output is the next move, see what Starpop can do for your content production.